bpmn-js 阅读指南:
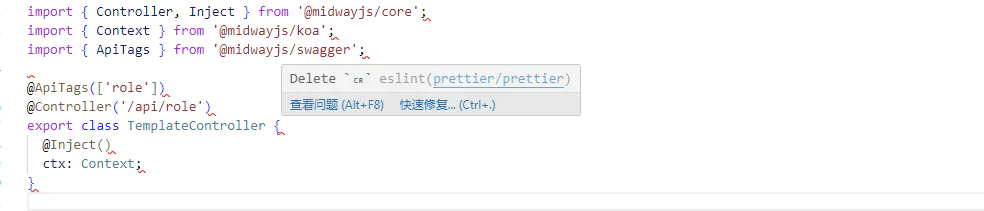
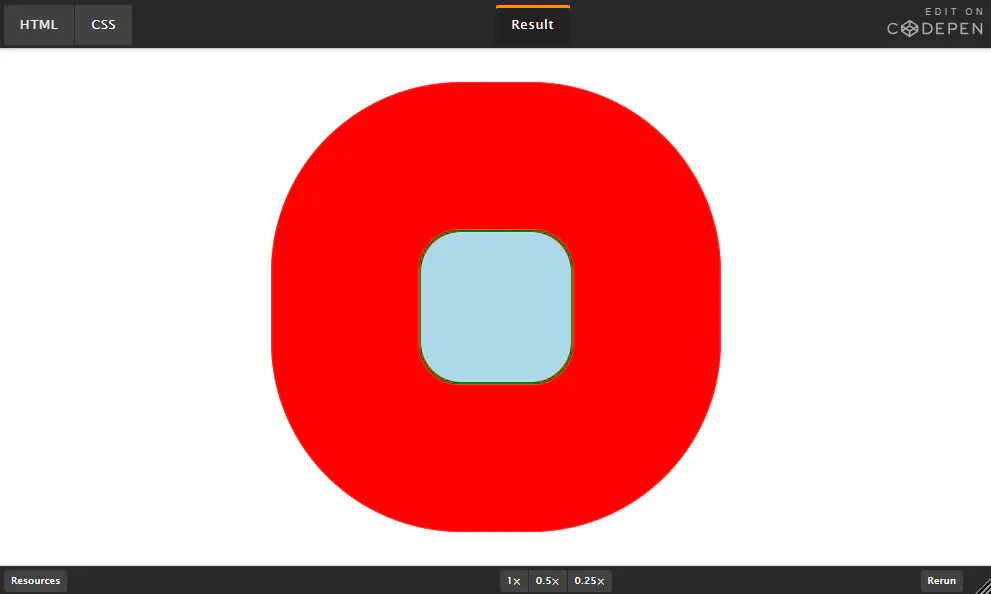
bpmn-js是一个基于BPMN 2.0规范定义的一个bpmn文件读写一体化编辑解决方案,其中bpmn的读写功能依托于bpmn-moddle工具库来实现。使用bpmn-moddle来进行bpmn文件的读取和写入不是随心所欲的,它又一套自己的校验标准,默认的bpmn-moddle是基于BPMN 2.0 元模型xml文件的。使用bpmn-moddle进行模型创建和维护的控制也是为了保证我们模型的元素和属性的一致性,方便我们的模型迁移后者复用。当校验不通过,我们的建模器将无法成功创建bpmn模型,bpmn-js中的显示效果如下:
BPMN 2.0 元模型
为了保证建模的一致性原则,我们所有基于BPMN 2.0实现的建模生成器,都必须要满足BPMN 2.0元模型 描述说明, BPMN 2.0元模型 要求必须支持如下的所有子元素和对应元素属性:
元素 属性 participant (pool) id, name, processRef laneSet id, lane with name, childLaneSet, flowElementRef sequenceFlow (unconditional) id, name, sourceRef, targetRef messageFlow id, name, sourceRef, targetRef exclusiveGateway id, name parallelGateway id, name task (None) id, name userTask id, name serviceTask id, name subProcess (expanded) id, name, flowElement subProcess (collapsed) id, name, flowElement CallActivity id, name, calledElement DataObject id, name TextAnnotation id, text association/dataAssociation id, name, sourceRef, targetRef, associationDirection dataStoreReference id, name, dataStoreRef startEvent (None) id, name endEvent (None) id, name messageStartEvent id, name, messageEventDefinition messageEndEvent id, name, messageEventDefinition timerStartEvent id, name, timerEventDefinition terminateEndEvent id, name, terminateEventDefinition documentation text Group id, categoryRef
bpmn-moddle是通过描述文件进行控制元素一致性校验的,bpmn-moddle内置了一些基础的json描述文件配置,几种包含di.json、dc.json定义基础的数据辅助类型、形状、颜色的信息等,如下为bpmn的基础元素描述定义文件bpmn.json,想要了解更多内置定义可以参考:bpmn-moddle/resources/bpmn 位置下的所有描述定义文件:
{
  "name": "BPMNDI",
  "uri": "http://www.omg.org/spec/BPMN/20100524/DI",
  "prefix": "bpmndi",
  "types": [
    {
      "name": "BPMNDiagram",
      "properties": [
        {
          "name": "plane",
          "type": "BPMNPlane",
          "redefines": "di:Diagram#rootElement"
        },
        {
          "name": "labelStyle",
          "type": "BPMNLabelStyle",
          "isMany": true
        }
      ],
      "superClass": [
        "di:Diagram"
      ]
    },
    {
      "name": "BPMNPlane",
      "properties": [
        {
          "name": "bpmnElement",
          "isAttr": true,
          "isReference": true,
          "type": "bpmn:BaseElement",
          "redefines": "di:DiagramElement#modelElement"
        }
      ],
      "superClass": [
        "di:Plane"
      ]
    },
    {
      "name": "BPMNShape",
      "properties": [
        {
          "name": "bpmnElement",
          "isAttr": true,
          "isReference": true,
          "type": "bpmn:BaseElement",
          "redefines": "di:DiagramElement#modelElement"
        },
        {
          "name": "isHorizontal",
          "isAttr": true,
          "type": "Boolean"
        },
        {
          "name": "isExpanded",
          "isAttr": true,
          "type": "Boolean"
        },
        {
          "name": "isMarkerVisible",
          "isAttr": true,
          "type": "Boolean"
        },
        {
          "name": "label",
          "type": "BPMNLabel"
        },
        {
          "name": "isMessageVisible",
          "isAttr": true,
          "type": "Boolean"
        },
        {
          "name": "participantBandKind",
          "type": "ParticipantBandKind",
          "isAttr": true
        },
        {
          "name": "choreographyActivityShape",
          "type": "BPMNShape",
          "isAttr": true,
          "isReference": true
        }
      ],
      "superClass": [
        "di:LabeledShape"
      ]
    },
    {
      "name": "BPMNEdge",
      "properties": [
        {
          "name": "label",
          "type": "BPMNLabel"
        },
        {
          "name": "bpmnElement",
          "isAttr": true,
          "isReference": true,
          "type": "bpmn:BaseElement",
          "redefines": "di:DiagramElement#modelElement"
        },
        {
          "name": "sourceElement",
          "isAttr": true,
          "isReference": true,
          "type": "di:DiagramElement",
          "redefines": "di:Edge#source"
        },
        {
          "name": "targetElement",
          "isAttr": true,
          "isReference": true,
          "type": "di:DiagramElement",
          "redefines": "di:Edge#target"
        },
        {
          "name": "messageVisibleKind",
          "type": "MessageVisibleKind",
          "isAttr": true,
          "default": "initiating"
        }
      ],
      "superClass": [
        "di:LabeledEdge"
      ]
    },
    {
      "name": "BPMNLabel",
      "properties": [
        {
          "name": "labelStyle",
          "type": "BPMNLabelStyle",
          "isAttr": true,
          "isReference": true,
          "redefines": "di:DiagramElement#style"
        }
      ],
      "superClass": [
        "di:Label"
      ]
    },
    {
      "name": "BPMNLabelStyle",
      "properties": [
        {
          "name": "font",
          "type": "dc:Font"
        }
      ],
      "superClass": [
        "di:Style"
      ]
    }
  ],
  "enumerations": [
    {
      "name": "ParticipantBandKind",
      "literalValues": [
        {
          "name": "top_initiating"
        },
        {
          "name": "middle_initiating"
        },
        {
          "name": "bottom_initiating"
        },
        {
          "name": "top_non_initiating"
        },
        {
          "name": "middle_non_initiating"
        },
        {
          "name": "bottom_non_initiating"
        }
      ]
    },
    {
      "name": "MessageVisibleKind",
      "literalValues": [
        {
          "name": "initiating"
        },
        {
          "name": "non_initiating"
        }
      ]
    }
  ],
  "associations": []
}
自定义元素模型
稍微了解下就能知道支持BPMN 2.0的工作流模型并非只有一家,有最开始的activiti,以及后续分家后的camunda和flowable,他们都基于BPMN 2.0之后进行的后续功能的支持,为了实现flowable或者camunda元素模型的适配,又或者进行我们自己自定义元素的扩展,我们都需要引入一个三方的元素模型配置,而bpmn-js也给我们提供了自定义加载配置的方式。bpmn-js支持在创建模型的时候通过moddleExtensions来配置自定义元素模型。
import BpmnModeler from "bpmn-js/lib/Modeler";
import flowableModdleDescriptor from '../descriptor/flowableDescriptor.json'

const bpmnModeler = new BpmnModeler({
        container: this.$refs["bpmn-canvas"],

        additionalModules: this.additionalModules,
        moddleExtensions: {
            flowable: flowableModdleDescriptor
        }, // 这里配置适配flowable
});其中flowableDescriptor.json的描述定义内容如下:
{
"name": "Flowable",
"uri": "http://flowable.org/bpmn",
"prefix": "flowable",
"xml": {
"tagAlias": "lowerCase"
},
"associations": [],
"types": [
{
"name": "InOutBinding",
"superClass": [
"Element"
],
"isAbstract": true,
"properties": [
{
"name": "source",
"isAttr": true,
"type": "String"
},
{
"name": "sourceExpression",
"isAttr": true,
"type": "String"
},
{
"name": "target",
"isAttr": true,
"type": "String"
},
{
"name": "businessKey",
"isAttr": true,
"type": "String"
},
{
"name": "local",
"isAttr": true,
"type": "Boolean",
"default": false
},
{
"name": "variables",
"isAttr": true,
"type": "String"
}
]
},
{
"name": "In",
"superClass": [
"InOutBinding"
],
"meta": {
"allowedIn": [
"bpmn:CallActivity"
]
}
},
{
"name": "Out",
"superClass": [
"InOutBinding"
],
"meta": {
"allowedIn": [
"bpmn:CallActivity"
]
}
},
{
"name": "AsyncCapable",
"isAbstract": true,
"extends": [
"bpmn:Activity",
"bpmn:Gateway",
"bpmn:Event"
],
"properties": [
{
"name": "async",
"isAttr": true,
"type": "Boolean",
"default": false
},
{
"name": "asyncBefore",
"isAttr": true,
"type": "Boolean",
"default": false
},
{
"name": "asyncAfter",
"isAttr": true,
"type": "Boolean",
"default": false
},
{
"name": "exclusive",
"isAttr": true,
"type": "Boolean",
"default": true
}
]
},
{
"name": "JobPriorized",
"isAbstract": true,
"extends": [
"bpmn:Process",
"flowable:AsyncCapable"
],
"properties": [
{
"name": "jobPriority",
"isAttr": true,
"type": "String"
}
]
},
{
"name": "SignalEventDefinition",
"isAbstract": true,
"extends": [
"bpmn:SignalEventDefinition"
],
"properties": [
{
"name": "async",
"isAttr": true,
"type": "Boolean",
"default": false
}
]
},
{
"name": "ErrorEventDefinition",
"isAbstract": true,
"extends": [
"bpmn:ErrorEventDefinition"
],
"properties": [
{
"name": "errorCodeVariable",
"isAttr": true,
"type": "String"
},
{
"name": "errorMessageVariable",
"isAttr": true,
"type": "String"
}
]
},
{
"name": "Error",
"isAbstract": true,
"extends": [
"bpmn:Error"
],
"properties": [
{
"name": "flowable:errorMessage",
"isAttr": true,
"type": "String"
}
]
},
{
"name": "PotentialStarter",
"superClass": [
"Element"
],
"properties": [
{
"name": "resourceAssignmentExpression",
"type": "bpmn:ResourceAssignmentExpression"
}
]
},
{
"name": "FormSupported",
"isAbstract": true,
"extends": [
"bpmn:StartEvent",
"bpmn:UserTask"
],
"properties": [
{
"name": "formHandlerClass",
"isAttr": true,
"type": "String"
},
{
"name": "formKey",
"isAttr": true,
"type": "String"
},
{
"name": "localScope",
"isAttr": true,
"type": "Boolean",
"default": false
}
]
},
{
"name": "TemplateSupported",
"isAbstract": true,
"extends": [
"bpmn:Process",
"bpmn:FlowElement"
],
"properties": [
{
"name": "modelerTemplate",
"isAttr": true,
"type": "String"
}
]
},
{
"name": "Initiator",
"isAbstract": true,
"extends": [ "bpmn:StartEvent" ],
"properties": [
{
"name": "initiator",
"isAttr": true,
"type": "String"
}
]
},
{
"name": "ScriptTask",
"isAbstract": true,
"extends": [
"bpmn:ScriptTask"
],
"properties": [
{
"name": "resultVariable",
"isAttr": true,
"type": "String"
},
{
"name": "resource",
"isAttr": true,
"type": "String"
}
]
},
{
"name": "Process",
"isAbstract": true,
"extends": [
"bpmn:Process"
],
"properties": [
{
"name": "candidateStarterGroups",
"isAttr": true,
"type": "String"
},
{
"name": "candidateStarterUsers",
"isAttr": true,
"type": "String"
},
{
"name": "processCategory",
"isAttr": true,
"type": "String"
},
{
"name": "versionTag",
"isAttr": true,
"type": "String"
},
{
"name": "historyTimeToLive",
"isAttr": true,
"type": "String"
},
{
"name": "isStartableInTasklist",
"isAttr": true,
"type": "Boolean",
"default": true
}
]
},
{
"name": "EscalationEventDefinition",
"isAbstract": true,
"extends": [
"bpmn:EscalationEventDefinition"
],
"properties": [
{
"name": "escalationCodeVariable",
"isAttr": true,
"type": "String"
}
]
},
{
"name": "xcField",
"isAbstract": true,
"properties": [
{
"name": "xcString",
"isMany": true,
"type": "Element"
} ,
{
"name": "name",
"isAttr": true,
"type": "String"
}
]
},
{
"name": "xcString",
"isAbstract": true,
"properties": [
{
"name": "body",
"isBody": true,
"type": "String"
}
]
},
{
"name": "FormalExpression",
"isAbstract": true,
"extends": [
"bpmn:FormalExpression"
],
"properties": [
{
"name": "resource",
"isAttr": true,
"type": "String"
}
]
},
{
"name": "Assignable",
"extends": [ "bpmn:UserTask" ],
"properties": [
{
"name": "dataType",
"isAttr": true,
"type": "String"
},
{
"name": "assignee",
"isAttr": true,
"type": "String"
},
{
"name": "xcformKey",
"isAttr": true,
"type": "String"
},
{
"name": "candidateUsers",
"isAttr": true,
"type": "String"
},
{
"name": "candidateGroups",
"isAttr": true,
"type": "String"
},
{
"name": "text",
"isAttr": true,
"type": "String"
},
{
"name": "dueDate",
"isAttr": true,
"type": "String"
},
{
"name": "followUpDate",
"isAttr": true,
"type": "String"
},
{
"name": "priority",
"isAttr": true,
"type": "String"
}
]
},
{
"name": "CallActivity",
"extends": [ "bpmn:CallActivity" ],
"properties": [
{
"name": "calledElementBinding",
"isAttr": true,
"type": "String",
"default": "latest"
},
{
"name": "calledElementVersion",
"isAttr": true,
"type": "String"
},
{
"name": "calledElementVersionTag",
"isAttr": true,
"type": "String"
},
{
"name": "calledElementTenantId",
"isAttr": true,
"type": "String"
},
{
"name": "caseRef",
"isAttr": true,
"type": "String"
},
{
"name": "caseBinding",
"isAttr": true,
"type": "String",
"default": "latest"
},
{
"name": "caseVersion",
"isAttr": true,
"type": "String"
},
{
"name": "caseTenantId",
"isAttr": true,
"type": "String"
},
{
"name": "variableMappingClass",
"isAttr": true,
"type": "String"
},
{
"name": "variableMappingDelegateExpression",
"isAttr": true,
"type": "String"
}
]
},
{
"name": "ServiceTaskLike",
"extends": [
"bpmn:ServiceTask",
"bpmn:BusinessRuleTask",
"bpmn:SendTask",
"bpmn:MessageEventDefinition"
],
"properties": [
{
"name": "expression",
"isAttr": true,
"type": "String"
},
{
"name": "class",
"isAttr": true,
"type": "String"
},
{
"name": "delegateExpression",
"isAttr": true,
"type": "String"
},
{
"name": "resultVariable",
"isAttr": true,
"type": "String"
}
]
},
{
"name": "DmnCapable",
"extends": [
"bpmn:BusinessRuleTask"
],
"properties": [
{
"name": "decisionRef",
"isAttr": true,
"type": "String"
},
{
"name": "decisionRefBinding",
"isAttr": true,
"type": "String",
"default": "latest"
},
{
"name": "decisionRefVersion",
"isAttr": true,
"type": "String"
},
{
"name": "mapDecisionResult",
"isAttr": true,
"type": "String",
"default": "resultList"
},
{
"name": "decisionRefTenantId",
"isAttr": true,
"type": "String"
}
]
},
{
"name": "ExternalCapable",
"extends": [
"flowable:ServiceTaskLike"
],
"properties": [
{
"name": "type",
"isAttr": true,
"type": "String"
},
{
"name": "topic",
"isAttr": true,
"type": "String"
}
]
},
{
"name": "TaskPriorized",
"extends": [
"bpmn:Process",
"flowable:ExternalCapable"
],
"properties": [
{
"name": "taskPriority",
"isAttr": true,
"type": "String"
}
]
},
{
"name": "Properties",
"superClass": [
"Element"
],
"meta": {
"allowedIn": [ "*" ]
},
"properties": [
{
"name": "values",
"type": "Property",
"isMany": true
}
]
},
{
"name": "Property",
"superClass": [
"Element"
],
"properties": [
{
"name": "id",
"type": "String",
"isAttr": true
},
{
"name": "name",
"type": "String",
"isAttr": true
},
{
"name": "value",
"type": "String",
"isAttr": true
}
]
},
{
"name": "Connector",
"superClass": [
"Element"
],
"meta": {
"allowedIn": [
"flowable:ServiceTaskLike"
]
},
"properties": [
{
"name": "inputOutput",
"type": "InputOutput"
},
{
"name": "connectorId",
"type": "String"
}
]
},
{
"name": "InputOutput",
"superClass": [
"Element"
],
"meta": {
"allowedIn": [
"bpmn:FlowNode",
"flowable:Connector"
]
},
"properties": [
{
"name": "inputOutput",
"type": "InputOutput"
},
{
"name": "connectorId",
"type": "String"
},
{
"name": "inputParameters",
"isMany": true,
"type": "InputParameter"
},
{
"name": "outputParameters",
"isMany": true,
"type": "OutputParameter"
}
]
},
{
"name": "InputOutputParameter",
"properties": [
{
"name": "name",
"isAttr": true,
"type": "String"
},
{
"name": "value",
"isBody": true,
"type": "String"
},
{
"name": "definition",
"type": "InputOutputParameterDefinition"
}
]
},
{
"name": "InputOutputParameterDefinition",
"isAbstract": true
},
{
"name": "List",
"superClass": [ "InputOutputParameterDefinition" ],
"properties": [
{
"name": "items",
"isMany": true,
"type": "InputOutputParameterDefinition"
}
]
},
{
"name": "Map",
"superClass": [ "InputOutputParameterDefinition" ],
"properties": [
{
"name": "entries",
"isMany": true,
"type": "Entry"
}
]
},
{
"name": "Entry",
"properties": [
{
"name": "key",
"isAttr": true,
"type": "String"
},
{
"name": "value",
"isBody": true,
"type": "String"
},
{
"name": "definition",
"type": "InputOutputParameterDefinition"
}
]
},
{
"name": "Value",
"superClass": [
"InputOutputParameterDefinition"
],
"properties": [
{
"name": "id",
"isAttr": true,
"type": "String"
},
{
"name": "name",
"isAttr": true,
"type": "String"
},
{
"name": "value",
"isBody": true,
"type": "String"
}
]
},
{
"name": "Script",
"superClass": [ "InputOutputParameterDefinition" ],
"properties": [
{
"name": "scriptFormat",
"isAttr": true,
"type": "String"
},
{
"name": "resource",
"isAttr": true,
"type": "String"
},
{
"name": "value",
"isBody": true,
"type": "String"
}
]
},
{
"name": "Field",
"superClass": [ "Element" ],
"meta": {
"allowedIn": [
"flowable:ServiceTaskLike",
"flowable:ExecutionListener",
"flowable:TaskListener"
]
},
"properties": [
{
"name": "name",
"isAttr": true,
"type": "String"
},
{
"name": "expression",
"type": "String"
},
{
"name": "stringValue",
"isAttr": true,
"type": "String"
},
{
"name": "string",
"type": "String"
}
]
},
{
"name": "InputParameter",
"superClass": [ "InputOutputParameter" ]
},
{
"name": "OutputParameter",
"superClass": [ "InputOutputParameter" ]
},
{
"name": "Collectable",
"isAbstract": true,
"extends": [ "bpmn:MultiInstanceLoopCharacteristics" ],
"superClass": [ "flowable:AsyncCapable" ],
"properties": [
{
"name": "collection",
"isAttr": true,
"type": "String"
},
{
"name": "elementVariable",
"isAttr": true,
"type": "String"
}
]
},
{
"name": "FailedJobRetryTimeCycle",
"superClass": [ "Element" ],
"meta": {
"allowedIn": [
"flowable:AsyncCapable",
"bpmn:MultiInstanceLoopCharacteristics"
]
},
"properties": [
{
"name": "body",
"isBody": true,
"type": "String"
}
]
},
{
"name": "ExecutionListener",
"superClass": [ "Element" ],
"meta": {
"allowedIn": [
"bpmn:Task",
"bpmn:ServiceTask",
"bpmn:UserTask",
"bpmn:BusinessRuleTask",
"bpmn:ScriptTask",
"bpmn:ReceiveTask",
"bpmn:ManualTask",
"bpmn:ExclusiveGateway",
"bpmn:SequenceFlow",
"bpmn:ParallelGateway",
"bpmn:InclusiveGateway",
"bpmn:EventBasedGateway",
"bpmn:StartEvent",
"bpmn:IntermediateCatchEvent",
"bpmn:IntermediateThrowEvent",
"bpmn:EndEvent",
"bpmn:BoundaryEvent",
"bpmn:CallActivity",
"bpmn:SubProcess",
"bpmn:Process"
]
},
"properties": [
{
"name": "expression",
"isAttr": true,
"type": "String"
},
{
"name": "class",
"isAttr": true,
"type": "String"
},
{
"name": "delegateExpression",
"isAttr": true,
"type": "String"
},
{
"name": "event",
"isAttr": true,
"type": "String"
},
{
"name": "script",
"type": "Script"
},
{
"name": "fields",
"type": "Field",
"isMany": true
}
]
},
{
"name": "TaskListener",
"superClass": [ "Element" ],
"meta": {
"allowedIn": [
"bpmn:UserTask"
]
},
"properties": [
{
"name": "expression",
"isAttr": true,
"type": "String"
},
{
"name": "class",
"isAttr": true,
"type": "String"
},
{
"name": "delegateExpression",
"isAttr": true,
"type": "String"
},
{
"name": "event",
"isAttr": true,
"type": "String"
},
{
"name": "script",
"type": "Script"
},
{
"name": "fields",
"type": "Field",
"isMany": true
}
]
},
{
"name": "FormProperty",
"superClass": [ "Element" ],
"meta": {
"allowedIn": [
"bpmn:StartEvent",
"bpmn:UserTask"
]
},
"properties": [
{
"name": "id",
"type": "String",
"isAttr": true
},
{
"name": "name",
"type": "String",
"isAttr": true
},
{
"name": "type",
"type": "String",
"isAttr": true
},
{
"name": "required",
"type": "String",
"isAttr": true
},
{
"name": "readable",
"type": "String",
"isAttr": true
},
{
"name": "writable",
"type": "String",
"isAttr": true
},
{
"name": "variable",
"type": "String",
"isAttr": true
},
{
"name": "expression",
"type": "String",
"isAttr": true
},
{
"name": "datePattern",
"type": "String",
"isAttr": true
},
{
"name": "default",
"type": "String",
"isAttr": true
},
{
"name": "values",
"type": "Value",
"isMany": true
}
]
},
{
"name": "FormProperty",
"superClass": [ "Element" ],
"properties": [
{
"name": "id",
"type": "String",
"isAttr": true
},
{
"name": "label",
"type": "String",
"isAttr": true
},
{
"name": "type",
"type": "String",
"isAttr": true
},
{
"name": "datePattern",
"type": "String",
"isAttr": true
},
{
"name": "defaultValue",
"type": "String",
"isAttr": true
},
{
"name": "properties",
"type": "Properties"
},
{
"name": "validation",
"type": "Validation"
},
{
"name": "values",
"type": "Value",
"isMany": true
}
]
},
{
"name": "Validation",
"superClass": [ "Element" ],
"properties": [
{
"name": "constraints",
"type": "Constraint",
"isMany": true
}
]
},
{
"name": "Constraint",
"superClass": [ "Element" ],
"properties": [
{
"name": "name",
"type": "String",
"isAttr": true
},
{
"name": "config",
"type": "String",
"isAttr": true
}
]
},
{
"name": "ExtensionElements",
"properties": [
{
"name": "operationList",
"type": "String",
"isAttr": true
}
]
},
{
"name": "OperationList",
"superClass": [ "Element" ],
"meta": {
"allowedIn": [
"bpmn:UserTask"
]
},
"properties": [
{
"name": "operationList",
"type": "FormOperation",
"isMany": true
}
]
},
{
"name": "FormOperation",
"superClass": [ "Element" ],
"properties": [
{
"name": "id",
"type": "String",
"isAttr": true
},
{
"name": "label",
"type": "String",
"isAttr": true
},
{
"name": "type",
"type": "String",
"isAttr": true
},
{
"name": "showOrder",
"type": "String",
"isAttr": true
},
{
"name": "multiSignAssignee",
"type": "String",
"isAttr": true
}
]
},
{
"name": "VariableList",
"superClass": [ "Element" ],
"meta": {
"allowedIn": [
"bpmn:UserTask"
]
},
"properties": [
{
"name": "variableList",
"type": "FormVariable",
"isMany": true
}
]
},
{
"name": "FormVariable",
"superClass": [ "Element" ],
"properties": [
{
"name": "id",
"type": "String",
"isAttr": true
}
]
},
{
"name": "DeptPostList",
"superClass": [ "Element" ],
"meta": {
"allowedIn": [
"bpmn:UserTask"
]
},
"properties": [
{
"name": "deptPostList",
"type": "DeptPost",
"isMany": true
}
]
},
{
"name": "DeptPost",
"superClass": [ "Element" ],
"properties": [
{
"name": "id",
"type": "String",
"isAttr": true
},
{
"name": "type",
"type": "String",
"isAttr": true
},
{
"name": "postId",
"type": "String",
"isAttr": true
},
{
"name": "deptPostId",
"type": "String",
"isAttr": true
}
]
},
{
"name": "UserCandidateGroups",
"superClass": [ "Element" ],
"meta": {
"allowedIn": [
"bpmn:UserTask"
]
},
"properties": [
{
"name": "type",
"type": "String",
"isAttr": true
},
{
"name": "value",
"type": "String",
"isAttr": true
}
]
},
{
"name": "CustomCondition",
"superClass": [ "Element" ],
"meta": {
"allowedIn": [
"bpmn:SequenceFlow"
]
},
"properties": [
{
"name": "type",
"type": "String",
"isAttr": true
},
{
"name": "operationType",
"type": "String",
"isAttr": true
},
{
"name": "parallelRefuse",
"type": "Boolean",
"isAttr": true,
"default": false
}
]
},
{
"name": "AssigneeList",
"superClass": [ "Element" ],
"meta": {
"allowedIn": [
"bpmn:StartEvent",
"bpmn:UserTask"
]
},
"properties": [
{
"name": "assigneeList",
"type": "Assignee",
"isMany": true
},
{
"name": "type",
"type": "String",
"isAttr": true
}
]
},
{
"name": "Assignee",
"superClass": [ "Element" ],
"properties": [
{
"name": "id",
"type": "String",
"isAttr": true
}
]
},
{
"name": "ConditionalEventDefinition",
"isAbstract": true,
"extends": [
"bpmn:ConditionalEventDefinition"
],
"properties": [
{
"name": "variableName",
"isAttr": true,
"type": "String"
},
{
"name": "variableEvent",
"isAttr": true,
"type": "String"
}
]
}
],
"emumerations": [ ]
}
如上,即为适配flowable实现的描述文件定义,就上述描述文件内容,来具体了解下描述定义文件格式。
元素模型定义格式
元素模型的定义校验是基于moddle库实现的,就上述的定义文件flowableDescriptor.json,我们来结构下文件结构,具体了解下每部分属性和结构的具体代码含义是什么,可以看出在上述的json描述文件是由name、 prefix、 types、 enumerations、 associations、uri、xml等属性组成的,各自属性
{
"name": "Flowable",
"uri": "http://flowable.org/bpmn",
"prefix": "flowable",
"xml": {
"tagAlias": "lowerCase"
},
"associations": [],
"types": [],
"enumerations": [],
}
prefix:是元素模型的前缀标识,用于区别不同元素模型,常见的如:bpmn、flowable、activiti、camunda等,这里我们可以定义属于我们自己的标识前缀name:包名,元素模型定义包名enumerations和associations:这是设计留待后用的types:这里用于定义元素模型的所有元素和属性信息uri:这里是定义模型的地址,需要保证唯一,内部会对prefix、uri进行唯一校验xml:指定配置xml的一些格式要求
元素类型定义
types是一组由自定义元素组成的定义元素类型集合,元素定义格式如下:
    {
"name": "Definitions",
"isAbstract": true,
"extends": ["bpmn:Definitions"],
"superClass": [ "Base" ],
"properties": [
{
"name": "diagramRelationId",
"isAttr": true,
"type": "String"
},
"meta": {
"allowedIn": [
"bpmn:StartEvent",
"bpmn:UserTask"
]
}
]
},
name:元素名,转化为xml则为‘<flowable:Definitions> ’isAbstract:是否可以被实例化,若为true则可以通过 moddle.create 创建。allowedIn:设置运行放在哪些元素标签内properties:支持属性集合superClass:类型可以通过指定superClass属性从一个或多个超类型继承。通过从超类型继承,类型继承了在超类型层次结构中声明的所有属性。继承的属性将根据它们在类型层次结构中声明的顺序显示在自己的属性之前。extends:一些元模型要求它将新的属性插入到某些现有的模型元素中。这可以使用extends扩展字段来简化。
定义属性格式
如上述properties中定义的属性集合,支持定义配置如下:
name:属性名type:属性类型,支持类型有:String, Boolean, Integer 、Real或者自定义的类型isMany:是否支持多个属性isAttr:是否是标签属性值,当为true可以直接加到标签属性上,如: ‘<flowable:Definitions diagramRelationId ='333' > </flowable:Definitions> ‘isBody:是否作为子元素包裹,相对于isAttr属性,该属性包裹name中的内容,如:<flowable:Definitions >diagramRelationId</flowable:Definitions>default:默认属性值redefines:重新定义从superClass继承的属性,重写名称、类型和限定符isReference:是否通过id属性应用另外一个对象作为属性值
标签操作
bpmn-js中使用moddle模块来进行维护属性标签的管理。通过上述定义后,接下来了解下如何创建和读取bpmn的xml标签。
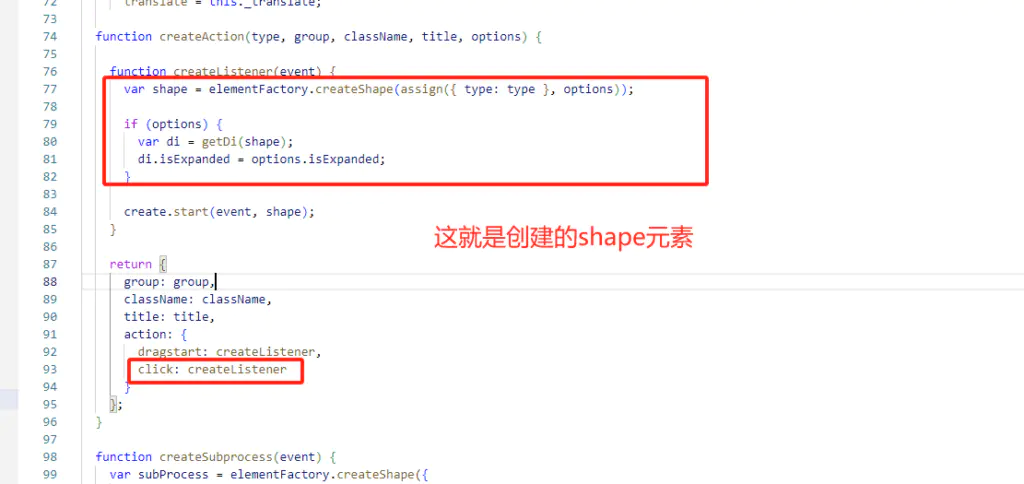
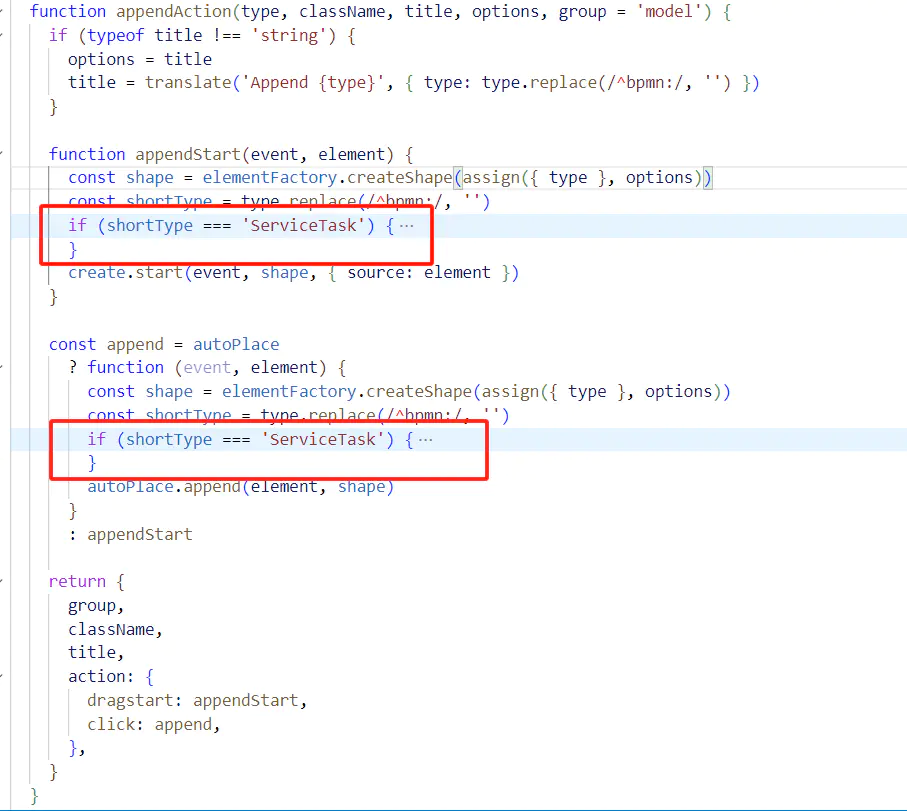
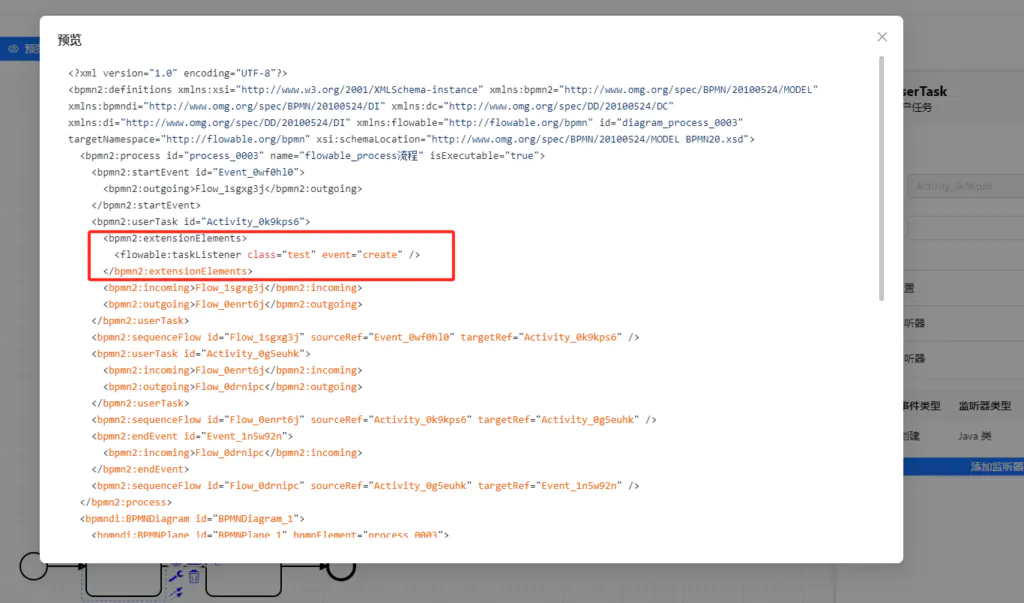
1、创建type
const moddle = bpmnModeler.get("moddle");
//  当前操作shape
const bpmnElement =  bpmnInstances.value?.bpmnElement
// 创建标签
const scriptTag= moddle.create("flowable:taskListener", { class: "test", event: "create" });
// bpmn内置支持的extensions isMany为true
const extensions = moddle.create('bpmn2:ExtensionElements', { values: [],})
// 将flowable:Script添加到bpmn:ExtensionElements内部
extensions.values.push(scriptTag)
// 通过modeling来更新
bpmnModeler.get("modeling").updateProperties(bpmnElement, {
extensionElements: extensions
});
2、读取标签信息
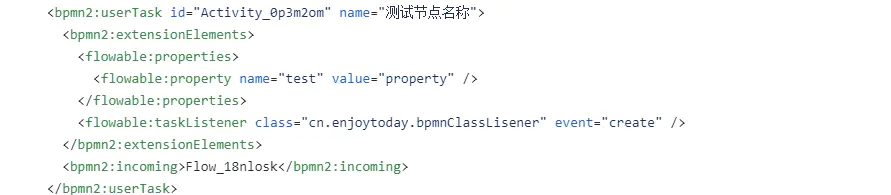
读取比较简单,标签直接以属性的方式挂载在businessObject对象下,如上述的extensionElements标签,可以使用如下方式进行读取:
const bpmnElement = bpmnInstances.value?.bpmnElement // 当前操作元素
const  target = bpmnElement.businessObject?.extensionElements?.values // extensions标签下的数组type,以上述方式写入则格式为:Object('flowable:Script')[]
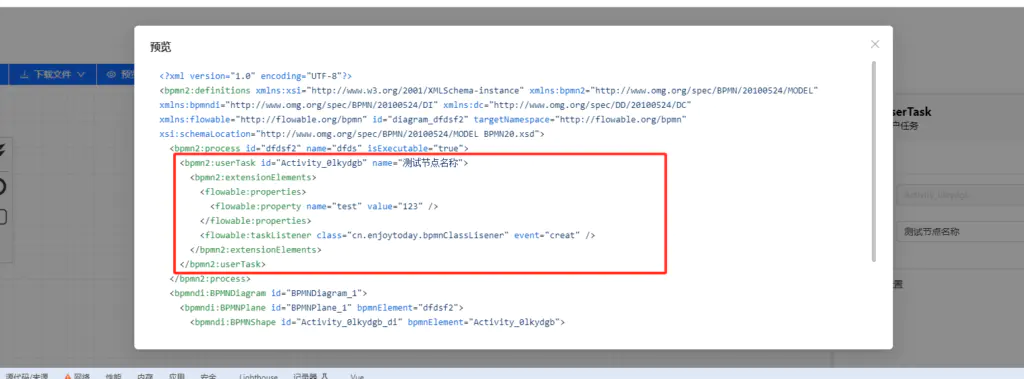
实现结果
如上,我们通过flowDescriptor.json配置支持flowable的自由属性来实现flowable的适配,这里尝试写入上述taskListener标签,结果如下: